Unknown Driver Analysis

Summary
The main idea behind this post is to describe the approach I used to identify the unknow driver's DriverEntry and its dispatch routines, using the BlackCat driver as an example.
Environment
Tools used during the analysis: Visual Studio 2019 Community, Windows Driver Kit - Windows 10.0.19041.685, WinDbg, VirtualKD-Redux, VMWare, IDA Freeware.
Static Analysis
The static analysis of this file showed that it was packed with VMProtect. To understand its functionality, we need to unpack it, which involves installing, loading, and running the driver.
| SHA256 | e092c183d513f8e1b0939a4956fd00515b6a801827fda5d5717dfed1ae2e1138 |
|---|---|
| Original File Name | idmtdi.sys |
| Size | 2.01 MB |
| Type | x64 Windows Kernel Driver |
| VT Creation Time | 2023-06-23 17:18:09 UTC |
| VT First Submission | 2024-05-07 09:44:06 UTC |
| Signed | VeriSign |
| Entropy | 7.8 (packed) |
| Sections | .text, .rdata, .data, .pdata, INIT, .]R2, .=A#, .E1-, .reloc, .rsrc |
| Company Name | Toner Inc. |
| File Description | Internet Download Managed TDI Driver |
| File Version | 6.32.3.80 |
| Product Name | Internel Download Manager |
| Packed | Yes, VMProtect |
Dynamic Analysis
Before running the unknown driver, I created a simple test driver that essentially does nothing in its DriverEntry routine except for calling __debugbreak(). The full driver code is listed below. The main idea is to install and load this test driver on the OS where you will be analyzing the unknown driver and to track the stack backtrace leading to the DriverEntry execution.
#include <ntddk.h>

DRIVER_UNLOAD TestUnload;

extern "C"
NTSTATUS DriverEntry(PDRIVER_OBJECT DriverObject, PUNICODE_STRING RegistryPath) {

	__debugbreak();

	UNREFERENCED_PARAMETER(RegistryPath);

	KdPrint(("Hello!\n"));

	DriverObject->DriverUnload = TestUnload;

	return STATUS_SUCCESS;
}

void TestUnload(PDRIVER_OBJECT DriverObject) {

	UNREFERENCED_PARAMETER(DriverObject);
	KdPrint(("Bye!\n"));
}
To install and load the driver, use the Service Control Manager and ensure your host is in test signing mode.
bcdedit /set testsigning on
sc create TestService type= kernel binPath= C:\del\test.sys
sc start TestService
sc stop TestService
When you start the service, WinDbg will break on int 3 due to the __debugbreak() call. From there, you can examine the stack backtrace on this specific OS. In my case, this was Windows 10 1909, and the stack backtrace looked like this:
1: kd> kc
 # Call Site
00 Test!DriverEntry
01 Test!GsDriverEntry
02 nt!IopLoadDriver
03 nt!IopLoadUnloadDriver
04 nt!ExpWorkerThread
05 nt!PspSystemThreadStartup
06 nt!KiStartSystemThread
We can see that the last ntoskrnl.exe function called before we move into test.sys is IopLoadDriver. This function loads a driver into the system and is a good place to set a breakpoint when analyzing the unknown driver. Set a break on it, unload the test driver, and load it again. We need to determine exactly how the call to test!DriverEntry happens:
1: kd> bp nt!IopLoadDriver
1: kd> bl
     0 e Disable Clear  fffff806`33519d34     0001 (0001) nt!IopLoadDriver
The first parameter passed to IopLoadDriver is the DriverServiceName , which is a pointer specifying the path to the driver's registry key. Once the breakpoint hits, examine the rcx register to confirm that you are inside the driver you need:
1: kd> !handle @rcx

PROCESS ffffd58fbc283300
    SessionId: none  Cid: 0004    Peb: 00000000  ParentCid: 0000
    DirBase: 001ad002  ObjectTable: ffff830050804b00  HandleCount: 2347.
    Image: System

Kernel handle table at ffff830050804b00 with 2347 entries in use

800005e8: Object: ffff830054b53400  GrantedAccess: 00020019 (Protected) (Audit) Entry: ffff8300531387a0
Object: ffff830054b53400  Type: (ffffd58fbc2a8380) Key
    ObjectHeader: ffff830054b533d0 (new version)
        HandleCount: 1  PointerCount: 1
        Directory Object: 00000000  Name: \REGISTRY\MACHINE\SYSTEM\CONTROLSET001\SERVICES\TEST
After confirming that you are analyzing the correct driver, you can step through IopLoadDriver manually to track the execution. In my case, the execution passed to test.sys though jmp rax in nt!guard_dispatch_icall. Step into the jmp and run uf @rip:
nt!guard_dispatch_icall+0x6e:
fffff806`32fd4d9e 0faee8          lfence
fffff806`32fd4da1 ffe0            jmp     rax

1: kd> uf @rip
Test!GsDriverEntry [minkernel\tools\gs_support\kmodefastfail\gs_driverentry.c @ 43]:
   43 fffff806`37865000 48895c2408      mov     qword ptr [rsp+8],rbx
   43 fffff806`37865005 57              push    rdi
   43 fffff806`37865006 4883ec20        sub     rsp,20h
   43 fffff806`3786500a 488bda          mov     rbx,rdx
   43 fffff806`3786500d 488bf9          mov     rdi,rcx
   45 fffff806`37865010 e817000000      call    Test!__security_init_cookie (fffff806`3786502c)
   46 fffff806`37865015 488bd3          mov     rdx,rbx
   46 fffff806`37865018 488bcf          mov     rcx,rdi
   46 fffff806`3786501b e800c0ffff      call    Test!DriverEntry (fffff806`37861020)
   47 fffff806`37865020 488b5c2430      mov     rbx,qword ptr [rsp+30h]
   47 fffff806`37865025 4883c420        add     rsp,20h
   47 fffff806`37865029 5f              pop     rdi
   47 fffff806`3786502a c3              ret
We can see a call to Test!DriverEntry. At this point, we have a general idea of how things should proceed when loading the driver. Let's apply this approach to our unknow driver and see if we can reach its DriverEntry. The method is the same: set the breakpoint on nt!IopLoadDriver and step into jmp rax in nt!guard_dispatch_icall. Don't forget to verify that you are tracking the correct driver loading process, either through !handle @rcx or through !address:
1: kd> !address fffff806`3883cb03
...
Mapping process, thread, and stack regions...
Mapping system cache regions...

Usage:                  Module
Base Address:           fffff806`38660000
End Address:            fffff806`3896b000
Region Size:            00000000`0030b000
VA Type:                BootLoaded
Module name:            malware.sys
Module path:            [\??\C:\dev\malware.sys]
The driver is packed, so once the loading processes passes execution to it, the unpacking stub will run instead of DriverEntry. If the driver was unpacked, we would see the jump to DriverEntry just like in the test.sys case. However, in this case, you need to go through the unpacking process first before DriverEntry will be executed. Can we speed this up and go straight to the unpacked driver code?
In this case, yes. I knew in advance that the malware sample loading this driver used it to stop the running EDR service. Every driver that interacts with a user-mode application must create a device object. This process will always involve calls to IoCreateDevice and IoCreateSymbolicLink from the DriverEntry function.
Once you confirm that you have started the unknow driver's execution through jmp rax, you can set a break point on nt!IoCreateDevice and then let it run. In theory, this should lead you to the DriverEntry function of the driver. I recommend disabling the breakpoint on nt!IopLoadDriver at this point to avoid interruptions from unrelated driver loads.
Once you break on nt!IoCreateDevice, confirm that this is the correct driver. If it is not, continue until you find the driver you are analyzing. If you keep breaking inside the driver that is not the target, disable the nt!IoCreateDevice breakpoint and set a breakpoint on nt!IoCreateSymbolicLink instead. This approach worked for me in this specific case:
1: kd> bl
     0 d Enable Clear  fffff806`33519d34     0001 (0001) nt!IopLoadDriver
     1 e Disable Clear  fffff806`33479b10     0001 (0001) nt!IoCreateDevice

0: kd> !address fffff806`33f21112
Mapping process, thread, and stack regions...
Mapping system cache regions...

Usage:                  Module
Base Address:           fffff806`33ee0000
End Address:            fffff806`33f51000
Region Size:            00000000`00071000
VA Type:                BootLoaded
Module name:            FLTMGR.SYS
Module path:            [\SystemRoot\System32\drivers\FLTMGR.SYS]

0: kd> g
Breakpoint 1 hit
nt!IoCreateDevice:
fffff806`33479b10 4055            push    rbp

I kept hitting IoCreateDevice inside ntoskrnl.exe and fltmgr
So I tried IoCreateSymbolicLink instead and it took me right to the unpacked
DriverEntry...

1: kd> bl
     0 d Enable Clear  fffff806`33519d34  0001 (0001) nt!IopLoadDriver
     1 d Enable Clear  fffff806`33479b10  0001 (0001) nt!IoCreateDevice
     2 e Disable Clear  fffff806`33521310 0001 (0001) nt!IoCreateSymbolicLink

1: kd> !address fffff806`38201095
...
Mapping process, thread, and stack regions...
Mapping system cache regions...


Usage:                  Module
Base Address:           fffff806`38200000
End Address:            fffff806`3850b000
Region Size:            00000000`0030b000
VA Type:                BootLoaded
Module name:            malware.sys
Module path:            [\??\C:\dev\malware.sys]
At this point, you are inside the DriverEntry routine, meaning you are running the unpacked code. Dump the code using WinDbg, unmap it with PE-Bear, and then load it into IDA.
1: kd> .writemem C:\DUMPS\malware.bin fffff806`38200000 L30b000
Writing 30b000 bytes..............................................
In WinDbg, you need to identify the driver's unload routine as well as its dispatch routine, as these will reveal what the driver does, where its callbacks are located, and which IOCTLs it processes. To do this, you just need to locate its DRIVER_OBJECT structure:
1: kd> !drvobj malware
Driver object (ffffd58fbffd97d0) is for:
 \Driver\malware

Driver Extension List: (id , addr)

Device Object list:
ffffd58fbfeedb70

1: kd> dt nt!_DRIVER_OBJECT ffffd58fbffd97d0
   +0x000 Type             : 0n4
   +0x002 Size             : 0n336
   +0x008 DeviceObject     : 0xffffd58f`bfeedb70 _DEVICE_OBJECT
   +0x010 Flags            : 2
   +0x018 DriverStart      : 0xfffff806`38200000 Void
   +0x020 DriverSize       : 0x30b000
   +0x028 DriverSection    : 0xffffd58f`bfe483b0 Void
   +0x030 DriverExtension  : 0xffffd58f`bffd9920 _DRIVER_EXTENSION
   +0x038 DriverName       : _UNICODE_STRING "\Driver\malware"
   +0x048 HardwareDatabase : 0xfffff806`337ba8f8 _UNICODE_STRING "\REGISTRY\MACHINE\HARDWARE\DESCRIPTION\SYSTEM"
   +0x050 FastIoDispatch   : (null)
   +0x058 DriverInit       : 0xfffff806`383dcb03     long  +fffff806383dcb03
   +0x060 DriverStartIo    : (null)
   +0x068 DriverUnload     : (null)
   +0x070 MajorFunction    : [28] 0xfffff806`32f29830     long  nt!IopInvalidDeviceRequest+0

1: kd> dx -id 0,0,ffffd58fbc283300 -r1 (*((ntkrnlmp!long (__cdecl*(*)[28])(_DEVICE_OBJECT *,_IRP *))0xffffd58fbffd9840))
(*((ntkrnlmp!long (__cdecl*(*)[28])(_DEVICE_OBJECT *,_IRP *))0xffffd58fbffd9840))                 [Type: long (__cdecl* [28])(_DEVICE_OBJECT *,_IRP *)]
    [0]              : 0xfffff80632f29830 : ntkrnlmp!IopInvalidDeviceRequest+0x0 [Type: long (__cdecl*)(_DEVICE_OBJECT *,_IRP *)]
    [1]              : 0xfffff80632f29830 : ntkrnlmp!IopInvalidDeviceRequest+0x0 [Type: long (__cdecl*)(_DEVICE_OBJECT *,_IRP *)]
This driver does not have unload routine, which means the only way to unload it is to reboot the host. Something tells me that this is a common thing in case of malicious driver =)
As you can see, all its dispatch routines initially point to IopInvalidDeviceRequest. This indicates that the driver sets up its dispatch routines after the device object is created, which is quite normal. Continue stepping through the DriverEntry function and examine the DRIVER_OBJECT as you go. You will notice that IRP_MJ_CREATE, IRP_MJ_CLOSE, and IRP_MJ_DEVICE_CONTROL entries are now populated:
1: kd> dx -id 0,0,ffffd58fbc283300 -r1 (*((ntkrnlmp!long (__cdecl*(*)[28])(_DEVICE_OBJECT *,_IRP *))0xffffd58fbffd9840))
(*((ntkrnlmp!long (__cdecl*(*)[28])(_DEVICE_OBJECT *,_IRP *))0xffffd58fbffd9840))                 [Type: long (__cdecl* [28])(_DEVICE_OBJECT *,_IRP *)]
    [0]              : 0xfffff80638202bd0 : 0xfffff80638202bd0 [Type: long (__cdecl*)(_DEVICE_OBJECT *,_IRP *)]
    [1]              : 0xfffff80638202c20 : 0xfffff80638202c20 [Type: long (__cdecl*)(_DEVICE_OBJECT *,_IRP *)]
    [2]              : 0xfffff80638202ba0 : 0xfffff80638202ba0 [Type: long (__cdecl*)(_DEVICE_OBJECT *,_IRP *)]
    [3]              : 0xfffff80638202c20 : 0xfffff80638202c20 [Type: long (__cdecl*)(_DEVICE_OBJECT *,_IRP *)]
    [4]              : 0xfffff80638202c20 : 0xfffff80638202c20 [Type: long (__cdecl*)(_DEVICE_OBJECT *,_IRP *)]
    [5]              : 0xfffff80638202c20 : 0xfffff80638202c20 [Type: long (__cdecl*)(_DEVICE_OBJECT *,_IRP *)]
    [6]              : 0xfffff80638202c20 : 0xfffff80638202c20 [Type: long (__cdecl*)(_DEVICE_OBJECT *,_IRP *)]
    [7]              : 0xfffff80638202c20 : 0xfffff80638202c20 [Type: long (__cdecl*)(_DEVICE_OBJECT *,_IRP *)]
    [8]              : 0xfffff80638202c20 : 0xfffff80638202c20 [Type: long (__cdecl*)(_DEVICE_OBJECT *,_IRP *)]
    [9]              : 0xfffff80638202c20 : 0xfffff80638202c20 [Type: long (__cdecl*)(_DEVICE_OBJECT *,_IRP *)]
    [10]             : 0xfffff80638202c20 : 0xfffff80638202c20 [Type: long (__cdecl*)(_DEVICE_OBJECT *,_IRP *)]
    [11]             : 0xfffff80638202c20 : 0xfffff80638202c20 [Type: long (__cdecl*)(_DEVICE_OBJECT *,_IRP *)]
    [12]             : 0xfffff80638202c20 : 0xfffff80638202c20 [Type: long (__cdecl*)(_DEVICE_OBJECT *,_IRP *)]
    [13]             : 0xfffff80638202c20 : 0xfffff80638202c20 [Type: long (__cdecl*)(_DEVICE_OBJECT *,_IRP *)]
    [14]             : 0xfffff80638202c40 : 0xfffff80638202c40 [Type: long (__cdecl*)(_DEVICE_OBJECT *,_IRP *)]
    [15]             : 0xfffff80638202c20 : 0xfffff80638202c20 [Type: long (__cdecl*)(_DEVICE_OBJECT *,_IRP *)]
    [16]             : 0xfffff80638202c20 : 0xfffff80638202c20 [Type: long (__cdecl*)(_DEVICE_OBJECT *,_IRP *)]
    [17]             : 0xfffff80638202c20 : 0xfffff80638202c20 [Type: long (__cdecl*)(_DEVICE_OBJECT *,_IRP *)]
    [18]             : 0xfffff80638202c20 : 0xfffff80638202c20 [Type: long (__cdecl*)(_DEVICE_OBJECT *,_IRP *)]
    [19]             : 0xfffff80638202c20 : 0xfffff80638202c20 [Type: long (__cdecl*)(_DEVICE_OBJECT *,_IRP *)]
    [20]             : 0xfffff80638202c20 : 0xfffff80638202c20 [Type: long (__cdecl*)(_DEVICE_OBJECT *,_IRP *)]
    [21]             : 0xfffff80638202c20 : 0xfffff80638202c20 [Type: long (__cdecl*)(_DEVICE_OBJECT *,_IRP *)]
    [22]             : 0xfffff80638202c20 : 0xfffff80638202c20 [Type: long (__cdecl*)(_DEVICE_OBJECT *,_IRP *)]
    [23]             : 0xfffff80638202c20 : 0xfffff80638202c20 [Type: long (__cdecl*)(_DEVICE_OBJECT *,_IRP *)]
    [24]             : 0xfffff80638202c20 : 0xfffff80638202c20 [Type: long (__cdecl*)(_DEVICE_OBJECT *,_IRP *)]
    [25]             : 0xfffff80638202c20 : 0xfffff80638202c20 [Type: long (__cdecl*)(_DEVICE_OBJECT *,_IRP *)]
    [26]             : 0xfffff80638202c20 : 0xfffff80638202c20 [Type: long (__cdecl*)(_DEVICE_OBJECT *,_IRP *)]
    [27]             : 0xfffff80632f29830 : ntkrnlmp!IopInvalidDeviceRequest+0x0 [Type: long (__cdecl*)(_DEVICE_OBJECT *,_IRP *)]
In many cases, the IRP_MJ_CREATE and IRP_MJ_CLOSE dispatch routines may not contain anything particularly interesting, while IRP_MJ_DEVICE_CONTROL is often where the main activity occurs. Let's take a look at it in IDA:
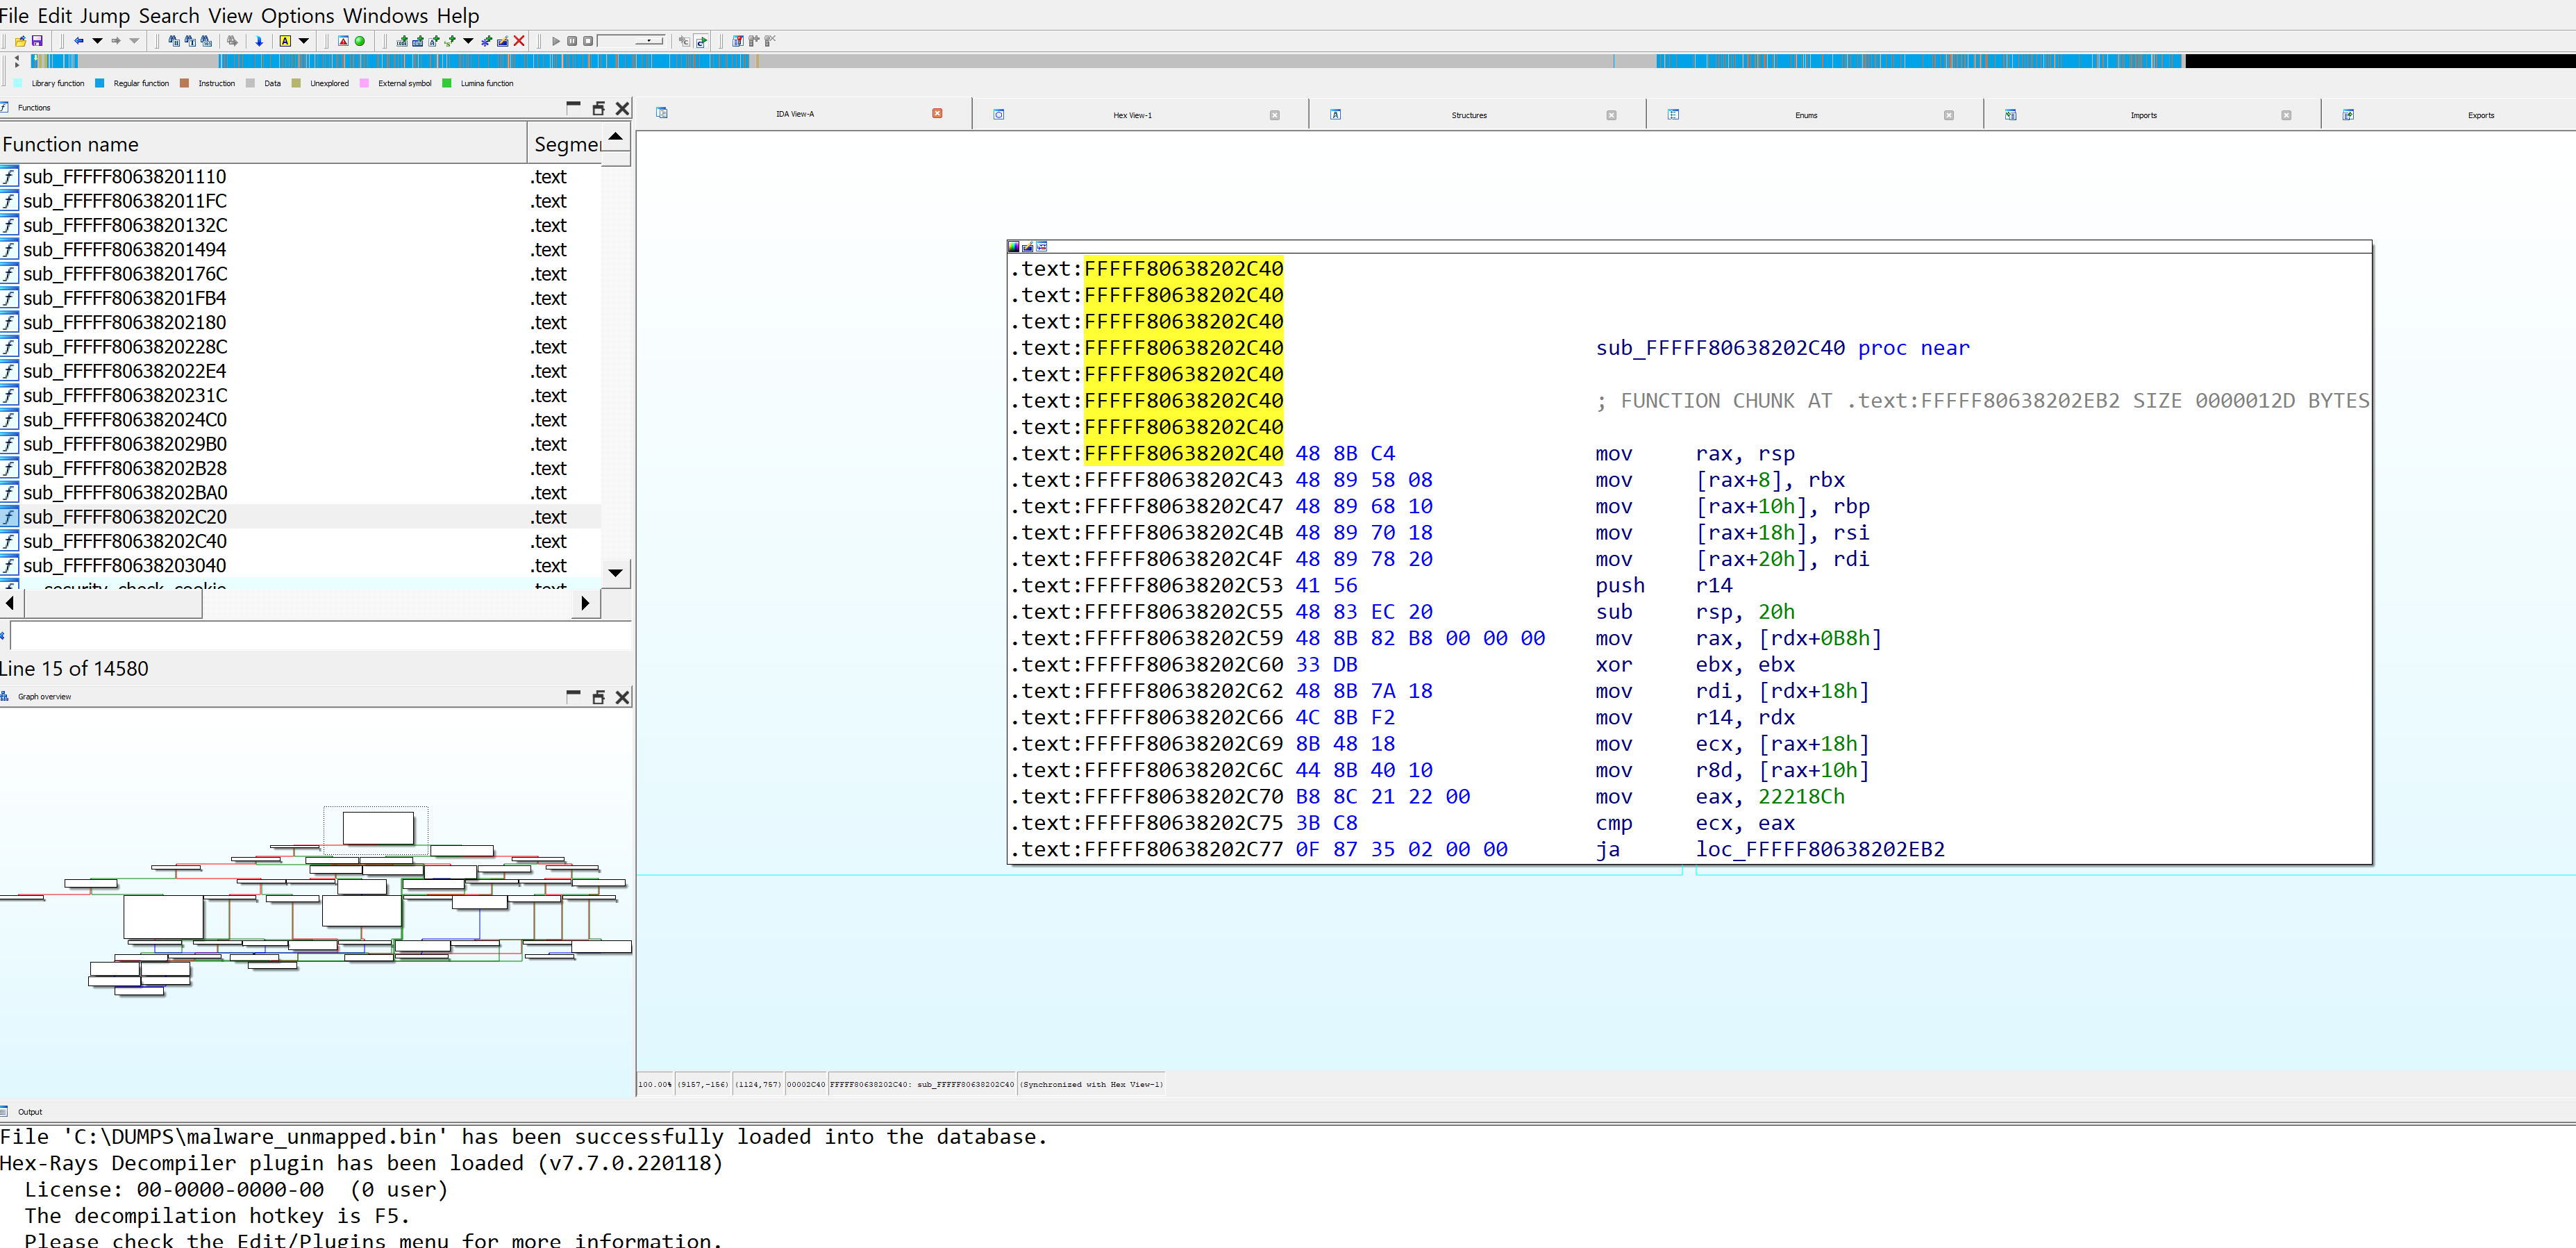
After examining it in IDA, you will notice a switch statement that processes following IOCTL values: 0x222088, 0x22208C, 0x222094, 0x222188, 0x22218C, 0x222190, 0x2221c8, 0x2221c4, 0x222264. These IOCTL values match those used by the BlackCat ransomware driver.
At this point, the analysis of this sample is complete. However, if you need to understand what each IOCTL does, you can create a user-mode client that calls DeviceIoControl with the IOCTL values you are interested in. In the kernel, set a breakpoint on the identified IRP_MJ_DEVICE_CONTROL routine, and you can track the IOCTL from there.
That's all for today =)
References
- https://exploitreversing.com/author/exploitreversing/
- https://exploitreversing.com/author/exploitreversing/
- https://augustomalnalysis.home.blog/
- https://www.unknowncheats.me/forum/general-programming-and-reversing/339829-dumping-driver-windbg.html
- https://voidsec.com/windows-drivers-reverse-engineering-methodology/